Winter is the perfect time to introduce children to creative art projects at home. Whether it’s the symmetry of a snowflake or the intricacy of a garland, there’s something for kids of all ages. Let’s get started with an engaging art project for the winter.
In this holiday-themed art lesson, Barbara Mason, alongside Artey, makes garland and snowflakes for upcoming winter celebrations. The skills developed in this lesson, including visualization and hand-eye coordination, are transferable to other crafts projects.
Materials Required for Making Garland and Snowflakes
The materials you will need for this lesson are paper, scissors and tape.
Learn to Make Holiday-Themed Art Video
Join Barbara during this winter-themed art project using simple and delicate paper cutouts. Turn plain paper into snowflakes or a garland.
Making Garland and Snowflakes with Barbara & Artey Lesson Plan
Creating Garland for the Winter Holidays
Read the video transcription as you watch Barbara’s lesson and learn the skill of making a garland or other similar paper cutouts.
Golden Road Arts is a nonprofit that offers art classes for kids so they can make the most of their own creativity. At Golden Road Arts we believe that children’s access to art is the key to reaching their full potential. Hi, this is Barbara Mason. Welcome to Golden Road Arts thanks for coming and joining me today. You’ll notice that I have my mask on and my friend back here, Artey, the art education bear has his mask on, and the reason is we don’t want to get the COVID pandemic virus, and we don’t want to give it to anybody. But since I’m the only one in this room except for the camera, I’m gonna take my mask off so I can talk to you a little easier. And then when I leave I’m gonna put it back on.
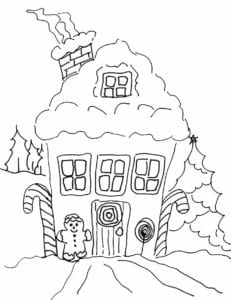
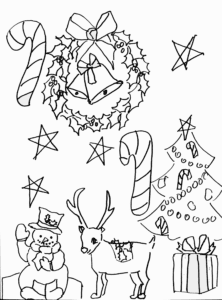
So today we’re going to do some really fun things that are kind of winter. So one of the things that I did for you all is I made some coloring pages and I have them here, so I’m just going to show them to you real quick. Here’s the candle and a wreath, and here’s a snowman. And here’s a little gingerbread house. I wonder if they ever really make houses out of gingerbread. I don’t know. Anyway, it’s a good idea, and here’s a stocking with lots of toys in it. That’ll be fun to color and then also I’ve got oh, and this is my favorite. This is my Santa Duck. He’s a little duck and he’s got a little candy cane in his hand. And then this is kind of a special one. This is a coloring page that if you color this, it can turn into a garland because you see that it connects right here. So if you cut this out, and you folded it in half, and cut it out and then you could tape it right here. Two more, two more. Two more so you could make it as long as you wanted. You could do it all the way across the side of your house or across the front of your windows.
I’m going to show you another one I’ve got here. I’ve got one here that’s almost done. And this one is colored paper. I just thought it would be kind of fun to have colored paper, so I’m just finishing up his little buttons here and his little frosting. Now this is brown colored paper, so I just did it with black. I think if you had other colors you could use different colors, but these are very very fun to do. And anybody can make them. They’re not hard at all. We’re going to put these on the Internet, so it’ll be pretty easy for you to cut them out.
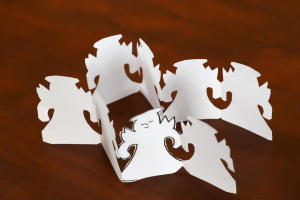
Follow the pattern, so what we’re going to do is we’re going to just cut these out. So cutting is an important skill, everybody needs to learn how to do this. And this is construction paper. Construction paper is kind of stiff. It’s kind of hard to cut, but I think if you’re careful and you go slow, you’ll be able to do it. So we’re cutting him out and then we get to the edge. We want to be really careful. Really careful that we go off the edge, and that we don’t cut the edge because where it goes together. That’s what’s going to hold it together. We want to make sure we don’t cut this part right here. Because if we cut that part then we’ll have lots of little individual gingerbread men, but they won’t be held together.
So we’re gonna just go cut him around here. Now I’ve already colored this one with my black pen so you can see he’s got his little dots for his face and his little tummy buttons. I guess maybe those would be raised as if he was really a cookie, but since he’s just a decoration. We can call it anything we want. Now again on this other side, I’m going to be really careful that I don’t cut it right here. I’m going to leave this part right here together. So of course you would have to take each one of these and draw on it. So as we open this up, you can see we’re going to have three, and then three more here. So if we wanted to hook this together, we would just take a piece of tape and we would tape it right here and then. We’d have six and you’d have to draw on each one of these to give him a little personality. But that would be fun to do. So and then you could hang this up in your house. It’s a good thing for the holidays to have gingerbread man.
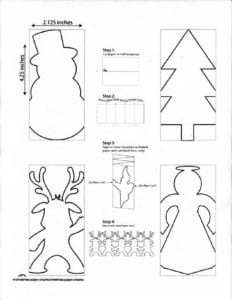
And then the other thing that I found this on the Internet and I’m gonna pass it along to you. I found some others. Now this is a snowman. So it’s the same idea we’re going to cut it out and I’m going to leave this edge right here. I’m not going to cut through that edge. And I’m gonna cut around. Cut out his hat. So. The more you cut, the better you’ll get at it. It’s hard at first, especially because I’ve got a lot of layers here. But after you do it, it gets easier the more you do something, the easier it gets. So again, I’m not cutting this part right here, ’cause I wanted to stick together. So now when I open this up. I should have a whole section of snowmen. Actually I’ve got two of these that I could hook together with a piece of tape so I can have eight snowmen. Of course you have to color each one, but that would be part of the fun, coloring each one. To give him personality so this one snowman has personality. We will take a picture of this too and these will be on the Internet so you’ll be able to download them.
And here’s an Angel. I thought this Angel was pretty cute. If you had too much trouble cutting this, you could probably get an older brother, sister to help you, or you could get your mom if it was too hard for you to do, but I think you can do it, and I think the more you do it, the easier it would get. So where we got a little Angel with their wings and their halo. Winter is a fun time, cold but fun. Have to bundle up when you go outside. And normally when it’s not in the situation right now, with the pandemic, you can go to the stores and see all the fun things. Go to the mall and see all the packages and all the bright lights. This year the only bright lights we’re going to be seeing on TV. But we’re going to be safe, and that’s the important thing. OK, so there we have another pile of scraps. OK, so we’re gonna open up our Angel. And again, you’ll have to color each one of these individually. Give him personality, but you can see there’s my list of angels. I’m here. I’ve got another one behind it so I could hook that together with a piece of tape. So I have 8 angels here. So I can make a little Angel Garland and this is very very fun to do.
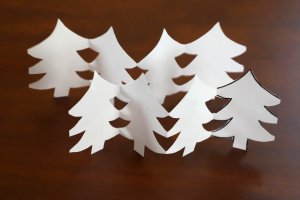
The other thing I found, I’m not going to do this for you because it’s a lot of cutting, while you’re watching this, but I’m going to show them to you. And then we’re going to put these on the Internet for you to use. You can just download these. And I thought these were very fun. Look at this, here is one that has a rabbit, a squirrel, a deer. Looks like Santa Claus, a bear, and pig, so if you are careful when you fold these and you don’t cut this out, you can do this.
Here’s another one that had the Santa, the Angel, a tree and it had a reindeer on it, so these will be very fun things for you to do, and I just found these on the Internet. You can find enough a lot of fun stuff on the Internet.
The next thing I want to show you is snowflakes. I started to make these snowflakes and I used to make them when I was young, when I was your age. But I kind of forgot how to do it. So the first ones I made, the first ones I made didn’t turn out very well. There doesn’t look a whole lot like a snowflake. I mean it does, but it just isn’t very pretty. I had to think a little bit more on how to do it. And I made this one, and it’s not very pretty either, and I thought what am I doing wrong? Why are these not turning out? And so I realized that what you have to do is when you take your paper, the first thing you have to do is you have to fold it like this across like this, at an angle, and make it square, fold it like that, then fold it down like this. Then you have to cut this extra piece off because this piece is going to make your snowflake and look funny. And so when I first did this, it folded it in half, and then I folded it in half again, and then I folded it in half, and I got this triangle. I thought, oh, that would be the way to do it, and I opened it up and it wasn’t awful, but it wasn’t great, and I thought what am I doing wrong? Then I looked on the Internet, good thing for the Internet, so you fold this in half like this and you get the center point right here on the bottom, right here where these two things match up, and then you have the center point and then instead of folding it in half like I did the first ones, you do it like this. You fold it like this. And then you fold it like this so it kind of looks like an ice cream cone. Well I guess it would be an ice cream cone with wings, but you can see. That we folded it. So now instead of just being in half like I did this one. We have three pieces. So now when we cut it. It’s gonna look even better and then I have patterns here that we’re going to put on the Internet of how to do this, that are very clear on how to fold it and how to cut it out. Now this is a very simple one. This would be a really good one if you’re not very old, because it’s pretty easy to cut.
These others that I have here are a little more complicated. So this one is. It doesn’t look too hard, so it depends on how you fold your paper. And this one also doesn’t look too hard, so we’re going to put these samples on the Internet and you’ll be able to download these. What I suggest you do to make this work easy is that you take a pencil or crayon, we’re going to instead of just cutting anyway, we’re going to actually draw it on here. So that we can say, OK, we’re going to cut this out right here, we’re going to make an X right here. So we’re going to cut that, and then we’re going to do some circle things here,maybe around like this. And then across the top we’re maybe going to do this, and then we’re going to maybe go this way. And then over here we’re maybe going to do some pieces like this. And then we could actually fold this again and cut a hole in the center. So I’m going to cut this here. I’m going to follow my line and if you draw this on here first you can draw your lines anyway you want. This is our curve line, remember. So remember how I folded this, folded it in thirds, so I’ve got 1/3 and 1/3. Just like that. Cut right on my lines. So you can make these any way you want. There’s no bad way to do them. They all turn out. Some are a little fancier than others, but doesn’t matter, and then one of the things that’s really fun to do is to put them on the window. Following my lines. I don’t know how I’m gonna cut that circle. Gosh, if I try to cut that, that’s gonna be hard to do.
Maybe what I will do is I will open this up, could I cut that many pieces? I don’t know. That’s a lot of stuff to cut through. Well, I think I got it. OK, so let’s open it up and see how are snowflake looks. Oh, look at that, It looks like a face. Well, when we get it all open it won’t look like a face. Look at that. That looks pretty good, doesn’t it? So this would be a good snowflake.
This is paper like you have in your printer, your computer paper that I’m using, just white paper. But the other thing you can use, and you can see I have all these different ones that I’ve done. They’re all a little different. They are all real pretty. I had some tissue paper. Yesterday that I used. Oh, actually, I think this was a napkin, so I cut it out of a napkin, so you can see that it’s really, really – I am going to lay it on the table here so you can see it – easier that this is really soft, really pretty, and it was easy to cut because napkins are very thin, so I cut pretty easy. So there’s my napkins snowflake.
And then the other thing that I’m going to show you how to do is do one with a coffee filter. Coffee filters are something that almost everybody has because almost everybody drinks coffee. So you can see if you just fold it in half, and then we’re going to fold it in half again so we can get the middle. Know where our middle is, and then we’re going to fold it in thirds just like we did. Just like we did with our white paper-we folded in thirds. So we’ve got thirds. So when you open it up like this, you’ve got one third, one third, one third, so you’ve got three sections. We’re going to fold it back together like this. This coffee filter is pretty thin. So if I draw on here what I’m going to do, I’ve got already got a round, but what if I make the edges of it pointed? What if I went like that? And then maybe I going up like this, and maybe going down like that. And then maybe a cross like this for the bottom. OK, so there’s our drawing. Now we’ll cut it out. If you turn this over you won’t see the lines. After you get done cutting, you’ll hardly see those lines, they won’t show. Just think how fun it’ll be when people come to your house, and they see your windows, and your windows have snowflakes all over them. They’ll say who made all those beautiful snowflakes, and you can say, It was me. I did it. OK, now we’re cutting our little curved lines, I think it will be easier to cut because it is really thin, but it is a bit harder. OK, so I was really careful when I cut this that I didn’t cut through my edges. I made sure that my pieces here that they’re still together, so that when I open it up, it’s going to hold together. I guess if it came apart you could always use tape. OK, here we go. Now we’re going to open this up all the way. Oh wow, that looks pretty good, doesn’t it? That’s a pretty good snowflake, I like that one.
So you notice that it’s kind of pouchy, and I want to make it flat. So how would we make these flat? How do you think we could get these to the flat? One of the things you could do is you could take a piece of paper and you could put under your snowflake. And you could take another piece of paper, put it over the top of your snowflake. And then you could take your next snowflake. Maybe not the one that’s that big. That one was pretty big. This is a little smaller one. You could take your next snowflake, lay it on here. And then get another piece of paper put over the top. And then your next snowflake. Another piece of paper over the top. And then your next snowflake. Turn it over so we can’t see our lines. So these are pretty pouchy. Look at how pouchy that is, but we’re going to flatten it out. So one of the ways we’re going to make it flat is we’re going to put something real heavy on it. So in this case we’re going to use a real heavy book, and we’re going to sit it on there, and we’re going to leave it till tomorrow. It’s hard to leave it till tomorrow, but if we leave it till tomorrow, it’s going to be flat. So we’ve got a real heavy book back here. We will use two books. We’re gonna put one book here. And another book on top of it. So these two heavy books are going to keep it flat and so in the morning when we take the books off, and we take our snowflakes out, they are going to be pretty flat. And then they’ll look good when we put them on our window.
You can put it on your window just with tape, tape is good. Or you can use a little glue, little glue that’s water soluble like your glue stick, and you just have to wash it off at the end of the season. But it comes right off.
So thank you for coming to Golden Road and making snowflakes with me. Making some garlands, and of angels and snowmen. Ann, I hope that you’re going to do some of these things and we’re going to see your house is really beautifully decorated for the holidays. And I’ll see you again soon. I’m going to put my mask back on because I’m going to be leaving the room and I want to make sure that I don’t give anything to anybody or that I don’t catch anything. So I’ll see you next time. Artey and I’ll be here at Golden Road. Have a good holiday.
Golden Road Arts is a nonprofit that offers art classes for kids so they can make the most of their own creativity. At Golden Road Arts we believe that children’s access to art is the key to reaching their full potential. Using simple materials usually found around the house, we explore the basics of the creative process. Together with Barbara, her sidekick, Artey the art bear and other Northwest artists, we invite you to join us on our creative adventure along the Golden Road.
Free Art Lessons for Elementary and Middle School Kids
Are you a parent or teacher looking for educational art content for elementary and middle school children? At Golden Road Arts, we have built a comprehensive library of art tutorials covering straightforward guides, art literacy content and much more. Watch our free lesson today.
Samples


